


The Reserve Bank of Australia (RBA) surprised the markets with a decision to keep interest rates on hold at 3.85% instead of cutting to 3.60%. How did our watchlist setups for this top-tier catalyst fare?
Watchlists are price outlook & strategy discussions supported by both fundamental & technical analysis, a crucial step towards creating a high quality discretionary trade idea before working on a risk & trade management plan.
If you’d like to follow our “Watchlist” picks right when they are published throughout the week, check out our BabyPips Premium subscribe page to learn more!
The Setup
- What We Were Watching: RBA Monetary Policy Statement (July 2025)
- The Expectation: Interest rate cut from 3.85% to 3.60%
- Data outcome: Rates maintained at 3.85% while RBA Governor Bullock reiterated “cautious, gradual stance” on easing
- Market environment surrounding the event: Neutral to risk-on; Easing geopolitical concerns and cautious risk-taking as traders started shrugging off tariff concerns
Event Outcome:
The RBA delivered a surprise decision to keep rates on hold at 3.85% despite the market consensus of a 0.25% interest rate cut. The decision was made in a split 6-3 vote, which also marked the first time the central bank published its voting breakdown.
Key points from the RBA statement:
- Recent monthly CPI data came in “slightly stronger than expected”
- Board wants more confirmation that inflation remains on track for 2.5%
- Cited heightened uncertainty about global trade policies and domestic demand
During the press conference, RBA Governor Bullock suggested further cuts remain likely once they gain more confidence in the inflation trajectory. The central bank noted that with rates already 50 basis points lower than five months ago, they could afford to wait for additional data.
Fundamental Bias Triggered: Bullish AUD Setups
Market sentiment swung between caution and optimism throughout the week as traders navigated tariff uncertainties ahead of the July 9 deadline.
The week opened with risk aversion after Trump threatened 10% tariffs on BRICS nations and announced 25% levies on Japan and South Korea by August 1. This sparked safe-haven flows into gold and the dollar while pressuring risk assets.
A brief bump in risk-taking was seen leading up to the RBA decision when Trump mentioned in a press briefing that the August 1 deadline is firm but “subject to negotiations” and that he is “open to other ideas,” even as more tariff letters were being sent out.
A turning point came with the FOMC minutes release on Wednesday, revealing a growing divide among policymakers on the scale and timing of future interest rate cuts. This dovish surprise triggered a sharp drop in Treasury yields and broad dollar weakness while lifting equities and bitcoin to new highs above $116,000.
Energy markets saw significant volatility, with WTI crude initially surging on Houthi attacks in the Red Sea and OPEC+ production increases, before reversing on weak Chinese demand forecasts. The Australian dollar emerged as a star performer after the RBA surprised markets by holding rates at 3.85%, while Fed officials’ comments about potential rate cuts despite tariff-induced inflation kept risk appetite supported, at least until Trump hit Canada with a 35% threat on Friday!
AUD/CHF: Net Bullish AUD Event outcome + Risk-On Scenario = Arguably best odds of a net positive outcome
AUD/CHF 1-hour Forex Chart by TradingView
In our watchlist, we anticipated that AUD/CHF would find support at the bottom of its descending channel in case the RBA surprised with a decision to hold instead of cutting by 0.25%. Our thesis was based on a combination of potential risk-on flows from easing global trade tensions and dovish expectations for the SNB.
Although the pair already bounced off the channel bottom ahead of the event due to cautious optimism amid the U.S. tariff deadline extension, the actual event still triggered a bullish AUD reaction and a sustained rally to the channel resistance and beyond.
AUD/CHF hovered near the top of its channel as risk-off flows picked up following confirmation that the tariff deal deadline was pushed to August 1. That extension kept uncertainty in play and encouraged some traders to lock in gains.
The next day, the FOMC minutes showed that “a couple of” members were in favor of a July rate cut. That weighed on U.S. 10-year yields and the dollar, giving the Swiss franc a lift as safe-haven demand returned. AUD/CHF pulled back toward pre-event levels near the S1 support.
Still, the pair found its footing and staged a stronger breakout from the channel later in the week, supported by dovish Fed commentary that kept the door open for lower U.S. borrowing costs. Traders also shrugged off fresh tariff threats and instead priced in stronger demand for equities and renewed hopes for U.S. trade deals.
Not Eligible to move beyond Watchlist – Bearish AUD Setups and GBP/AUD short strategy
GBP/AUD: Bullish AUD Event outcome + Risk-Off Scenario

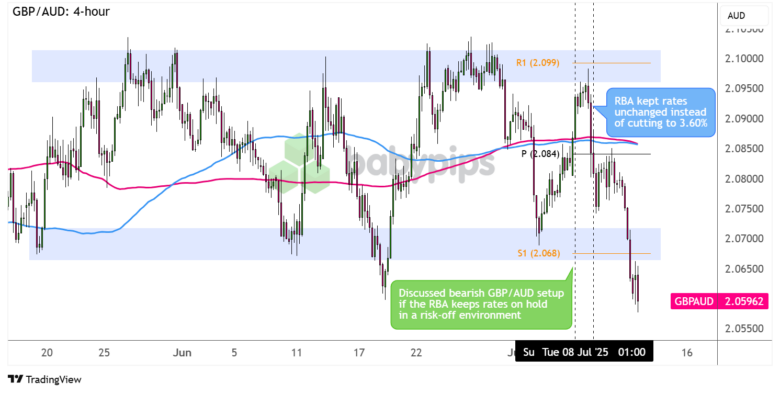
GBP/AUD 4-hour Forex Chart by TradingView
While the event outcome supported a bearish setup on GBP/AUD, the broader risk mood heading into the RBA decision didn’t quite match. Markets were leaning optimistic, likely hoping for another “TACO” scenario or progress on trade deals after the tariff deadline was pushed back.
Still, the RBA surprise would have played out nicely for the pair, which had already bounced off the range resistance zone near R1 and the 2.1000 major psychological level we had our eyes on.
GBP/AUD kept the bearish momentum going below the pivot point, paused for a quick pullback, then resumed its slide down to the range support at S1 and beyond.
Appetite for European currencies faded as U.S.-EU trade talks remain uncertain and the U.S. rolled out more tariff warnings. Meanwhile, risk sentiment turned more positive, and traders brushed off the unimplemented threats, giving commodity currencies like the Aussie a fresh boost. Finally, GBP was knocked lower on Friday thanks to weaker-than-expected UK GDP updates, sending GBP/AUD to fresh intraweek lows a few hours ahead of the close.
AUD/NZD Short: Net Bearish AUD Event outcome + Risk-Off Scenario

AUD/NZD 1-hour Forex Chart by TradingView
AUD/NZD dipped toward the Pivot Point level ahead of the RBA decision, but that move wasn’t really about the RBA’s stance. The drop likely reflected broader risk jitters tied to tariff uncertainty, especially after the U.S. slapped a 50 percent tariff on copper imports, a move that weighed on the Aussie before the event even kicked off.
Once the RBA surprised markets by holding rates steady, AUD/NZD quickly popped higher, jumping from around 1.0825 to above 1.0870. The decision marked a clear policy divergence from the RBNZ, which had kept its dovish tone intact this week.
From there, the pair extended its gains as the Aussie drew more support from the pickup in risk appetite than the New Zealand dollar did. Optimism over trade deals, fresh Fed rate cut speculations, and broad USD weakness gave the currency a solid tailwind.
AUD/JPY Long: Bearish AUD Event outcome + Risk-On Scenario

AUD/JPY 1-hour Forex Chart by TradingView
Our original discussion on AUD/JPY was invalidated right away with the RBA surprise, but for those who adjusted to the new information and adapted to it, potentially could have seen favorable outcomes.
Unlike in our strategy setup, AUD/JPY didn’t drop closer to the channel support before the RBA decision. The 94.40 level held firm, and instead of dipping, the pair turned higher ahead of the event as the yen took a hit following the U.S. announcement of a 25% tariff on Japanese goods.
That anti-yen sentiment spilled into Tuesday and likely helped fuel AUD/JPY’s sharp move higher after the RBA surprised with a rate hold. The pair broke above its earlier July highs, then paused for a brief pullback on Wednesday as the FOMC minutes boosted Fed rate cut expectations and gave the yen a short-lived lift.
By the end of the week, AUD/JPY was back on the move, breaking through the R2 Pivot Point resistance as traders likely leaned on that RBA hold surprise, and falling odds of BOJ rate hikes after weaker-than-expected Japanese PPI data on Friday.
The Verdict
Our fundamental analysis and watch scenario based on improving risk appetite and a net positive AUD outcome leaned in favor of a potential long AUD/CHF setup.
Our technical analysis nailed the channel bottom support zone as a potential area of interest for long entries ahead of the event, plus the possibility of the pair sustaining its bounce momentum back above S1 and the pivot point level if sentiment continued to lean in favor of risk currencies after the RBA decision.
And thanks to additional risk-on flows from the FOMC minutes and Fed rhetoric in the latter part of the week, AUD/CHF was poised to extend its upside past the channel resistance onto R1 then R2.
Overall, we assess this as likely supportive of a net positive outcome since AUD was already enjoying a bit of a risk-on boost pre-event and managed to hold its ground before another push higher on Thursday.
The alignment of fundamental and technical factors made for a straightforward play: Tariffs deadline delay supported risk-taking, policy divergence between RBA and SNB highlighted in surprise hold decision, and Fed easing narrative led to another wave higher.
Still, trade management and execution would have played a minor role, as short-term pullbacks during the RBA press conference and tariffs announcements later on could have offered better entry opportunities with higher return-on-risk compared to breakout plays.
Key Takeaways:
Role of External Factors
With all the market focus on tariff developments, it’s no surprise that actual announcements and even threats of countermeasures have caused huge swings in sentiment, playing a key role in the outcome of the AUD setups.
Trade headlines and Trump’s Truth Social posts could have gone either way, so the importance of being quick on your feet in terms of actively managing open positions cannot be overstated, especially since the RBA decision took place early in the week before a whole host of other market events unfolded.
Making Entry and Risk Adjustments
While the watchlist setups pinpointed key inflection points for trade entry targets, several market developments leading up to the actual RBA event already allowed the levels to hold and some momentum to come into play.
Adjustments to entry levels to account for these price movements should also come with appropriate changes to stop losses and/or position sizes to ensure proper risk management while staying flexible with targets. In this case, maintaining a bullish AUD bias despite midweek dips would have kept AUD/CHF in a solid position to take advantage of the post-FOMC risk rally past initial conservative targets.
The forex analysis content provided in Babypips.com is intended solely for informational purposes only. The technical and fundamental scenarios discussed are presented to highlight and educate on how to spot potential market opportunities that may warrant further independent research and due diligence. This content shows how we cover a portion of the full trading process, and does not constitute that we ever give specific investment or trading advice. The setups and analyses presented on Babypips.com are very likely not suitable for all portfolios or trading styles.
Trade and risk management are the sole responsibility of each individual trader. All trading decisions and their subsequent outcomes are the exclusive responsibility of the individual making them. Please trade responsibly.
Trading responsibly means knowing as much as you can about a market before you think about taking on risk, and if you think this kind of content can help you with that, check out our BabyPips Premium subscribe page to learn more!


